You’re being featured on national TV and must be certain that your web site will handle a sudden surge in traffic. You’ve heard about instant scalability in the cloud, but haven’t made the leap to autoscale cloud deployment yet. What are you waiting for?
Dozens, if not hundreds, of ISPs have spawned special business units dedicated to cloud hosting, and many of them support scalability features that claim to automatically increase your server’s capacity, whenever it is needed. Sounds great, right? That’s exactly what you need!
Be sure to read the fine print! Some of the most popular cloud-based web site hosting providers include VPS.net, RackspaceCloud.com and FireHost.com — although many lists of the top cloud hosting providers don’t even mention Amazon Web Services! Why? Cloud hosting features and options at various cloud hosts are quite different from each other, and not all cloud-based auto-scale works as you might expect it to work. Do your homework before switching from your current ISP—it can really pay off.
Case in point: We’ve recently learned that some ISPs which claim to offer auto-scaling server solutions actually don’t auto-scale anything at all! Instead, they’ll monitor your server, and when it reaches a peak load of, say 80% CPU utilization, they’ll actually shut off your site! Surprised? It’s true. Of course they’ll spin up a new larger instance of your app server a few seconds later to handle the load, which is how they can legally put wording such as ‘…automatically scale resources…’ on their sign up pages, but what about those critical moments of down time, right when you need it most?
Still other cloud hosts will automatically scale up your web server during a traffic spike, which is great, but they don’t notify you, and they also don’t automatically scale it back down when the traffic dissipates, leaving you with a bigger-than-expected bill at the end of the month and hours of wasted time on a support ticket thread to sort out billing confusion. Again, read the fine print, check for reviews online, and chat or email their sales team with every question you can think of before selecting any hosting provider.
Auto-Scaling Done Right
In preparation for a recent television airing, we helped one of our clients deploy a microsite on a load-balanced, auto-scaling cluster of web servers using Amazon Web Services. AWS offers a true auto-scale solution that is capable of delivering your site flawlessly with zero downtime, yes, that’s 100% uptime, and fast response times—even during short periods of huge traffic bursts. Better yet, they provide these tools at incredibly affordable rates that keep getting lower all the time.
Sounds great, right? Using our guide below, you’ll be autoscaling in no time.
Part 1: Creating your EC2 Instance Template
In this first section, we’re going to create an EC2 instance to run our web application, upload our content to it, and create an AMI, or Amazon Machine Image. From this template, we can clone additional web servers to build our autoscale cluster.
Create an Amazon.com account
It may seem obvious, but the first step in using Amazon Web Services is to create an account on Amazon.com. If you’ve bought a book or own a Kindle, you most likely already have one, and if so, you’re half done with this step. Your Amazon.com account links you to all of AWS. Just click over to Amazon, login, and redirect your browser to aws.amazon.com, accept the prompts, enter your credit card and so on. Note that you pay nothing until you actually start utilizing services. Furthermore, you don’t need to worry about accidentally spinning up some expensive server: with Amazon’s Free Tier usage plan, the first 750 hours of compute time, per month, every month, are 100% free.
Obtain x.509 credentials and API key
To use the AWS command line tools, first you’ll need to obtain your AWS ID keys, the necessary security credentials needed to connect and manage the services in your account from the command line. Visit the Amazon AWS Security Credentials for more in depth information.
Generate your access keys:
- Login to your AWS Management Console
- Hover over “My Account/Console” link on the top right of your screen and select the “Security Credentials” option
- Scroll down and select the “X.509 certificates” tab
- Click on the “Create a new Certificate” link.
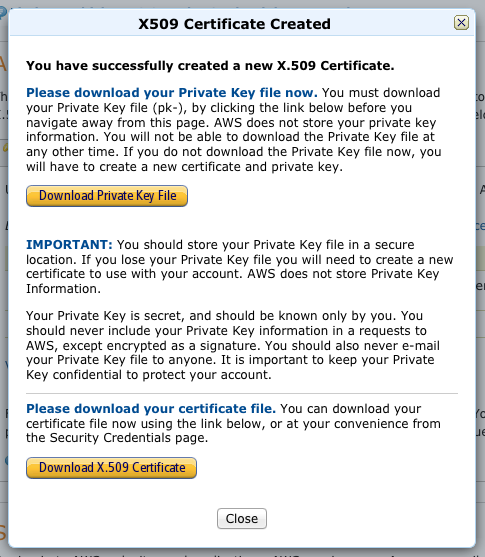
Amazon will generate two files:
- A PEM encoded RSA private key named something like pk-xxxxxxx.pem – you must download this Private Key before navigating away from the page
- A PEM encoded X.509 certificate named something like cert-xxxxxxx.pem
- Download both PEM encoded files
- Download the Amazon EC2 API Tools
- Create a “.aws” folder in your home directory
- Copy the certificate and RSA private key into your ~/.aws directory
- Unzip the Amazon EC2 Command-Line Tools, look in the new directory and move both the bin and lib directory into your ~/.aws directory. This directory should now have the following:
- The cert-xxxxxxx.pem file
- The pk-xxxxxxx.pem file
- The bin directory
- The lib directory
Install the tools
Most of the following tasks can be performed using the AWS Management Console, Amazon’s online, web-based interface to create, configure and deploy server instances on the Elastic Compute Cloud (EC2). Only a few steps require the command line tools. Download each of the tools, extract their contents, and create the following folder structure by copying each tools into these corresponding folders:
- Amazon EC2 API Tools → ~/.aws/ec2/*
- Auto Scaling Command Line Tool → ~/.aws/as/*
- CloudWatch Command Line Tool → ~/.aws/cw/*
- AMI Tools → ~/.aws/ami/* — not covered in this article, but may want to download for future use
Setup paths for Amazon EC2 Command-Line Tools
Edit your .bash_profile to setup the corresponding paths
export EC2_HOME=~/.aws/ec2
export EC2_PRIVATE_KEY=`ls ~/.aws/pk-*.pem`
export EC2_CERT=`ls ~/.aws/cert-*.pem`
export AWS_AUTO_SCALING_HOME=~/.aws/as
export AWS_CLOUDWATCH_HOME=~/.aws/cw
export AWS_AMITOOLS_HOME=~/.aws/ami
export AWS_CREDENTIAL_FILE=~/.aws/credentialsfilepath.txt
export PATH=$PATH:$EC2_HOME/bin:$AWS_AUTO_SCALING_HOME/bin:$AWS_CLOUDWATCH_HOME/bin:$AWS_AMITOOLS_HOME/bin
Launching EC2 Instances
If you have some knowledge of Linux system administration, you won’t believe how quick it is to set up your Web site on EC2. Thousands of Amazon Machine Images (AMIs) are available, in practically every flavor of OS you can imagine. Nearly all of them come with a variety of pre-installed software besides the OS, including many with Apache, PHP and MySQL. For a more detailed, step-by-step guide to this process, follow this Official Guide to using Amazon EC2. In a nutshell, here’s the process.
From the AWS Management Console:
- Login to your AWS Management Console
- Click the EC2 tab

- Click the Launch Instance button

- If this is your first time, choose the Classic Wizard and click Continue. This option will let you see and set every option, about 7 steps.

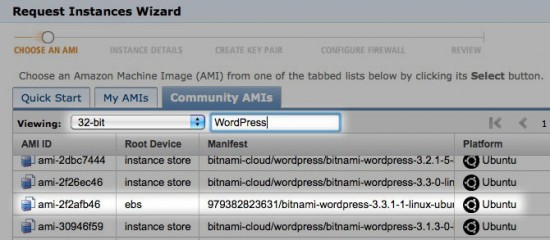
- Choose your distro. Under the Quick Start tab, you can instantly see the option for RedHat, SUSE and Ubuntu. If you’re comfortable configuring Apache, PHP and MySQL by hand, these are stock OSes with no fluff. For an even faster setup time, if you’re going to be running WordPress, Magento or another popular framework, search for it under Community AMIs—chances are someone has already preconfigured it with a LAMP stack ready to go. We chose the Bitnami WordPress stack.

We also chose an ebs-backed, 32-bit AMI so we can use it with Amazon’s t1.micro instance, the least expensive instance type. You can always restart this small instance as a larger instance size later. Click Select on the row that has the AMI you want to launch. - Launch 1 instance of a t1.micro. Don’t worry about which Availability Zone for now, just pick one and use the same one you choose here in later steps. Click Continue.

- You can leave all the defaults on the Advanced Instance Options screen. Just click Continue.
- On the next screen, Keys, you’re asked if you want to tag the server instance with any key value pairs. These are not security keys, and no keys are required. These keys are just tags to help sort and identify your servers quickly when you have lots of them running. If this were a web server only or a database server only, for example, you could add a key named type with a value of webserver or database respectively. Click Continue.
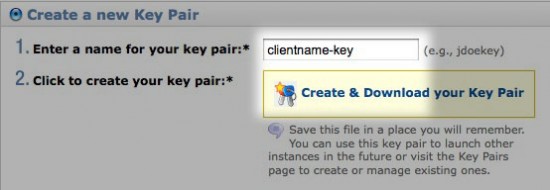
- On the next screen, I’d recommend that you create a new key-pair and download it to your ~/.aws/* folder, unless you have already created and downloaded another one, which will be listed and preselected under existing key pairs. If you’re going to be hosting multiple clients in your AWS account, create and use a unique key pair for each client. This key may just a text file with a .pem extension, but it’s very important! Don’t lose it!You will likely need to update your file permissions, otherwise you’ll receive a “Permissions 0644 are too open” when you try to ssh.
$PROMPT> chmod 0600 clientname-key.pem
After downloading the key, click Continue.

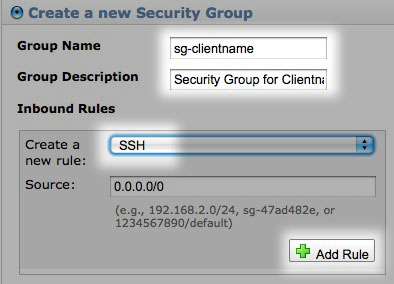
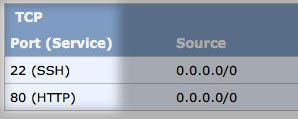
- On the Configure Firewall screen, you have to configure a Security Group. This is your firewall. You’ll want to be sure to open the port for HTTP (80) and SSH (22).

You don’t need any other ports open unless you plan to use other services. Common services are listed, and the default port numbers are automatically opened. The Source field default of 0.0.0.0/o means to allow all IPs and subnets on the entire Internet access to these ports. If you’re really careful with security, the SSH port is a good one to close down. To do this, enter your firewall IP address followed by “/0”. This way, the only way you can access the server instance via shell is from your office or home computer. No other computer on the net will be able to SSH into your server.

- The final screen just shows you a summary. Click Launch and your server will be online in about one minute!
Now that you have an idea of all the configuration options for an EC2 instance from using the online management console, it’s worth noting that you can perform the exact same procedure as show above from the command line by using the ec2-launch-instances command:
$PROMPT> ec2-run-instances ami-2f2afb46 -k clientname-key
There are a plethora of additional command line tools that allow you to create key pairs, search for AMIs and perform all the other steps of the process described visually above.
Connecting to your instance
Your EC2 instance is starting. When will it be up and running so you can connect to it?
- Click the Instances link in the left column

- Click the Refresh button in the upper right corner of the instance list periodically until your instance Status says Running.
- Check the checkbox in the left hand column of the instances list, and then expand the lower pane showing your 1 EC2 Instance selected details by dragging the horizontal divider upwards.
- In the instance details panel, you’ll see a line like this:
 EC2 Instance: i-2afd6f5c ec2-10-20-30-40.compute-1.amazonaws.com
 - The first blob, i-2afd6f5c, is this specific Instance’s unique ID. The next blob, ec2-10-20-30-40.compute-1.amazonaws.com, shows you the instance’s public DNS name. Note also that the four numbers are the instance’s public IP address.
- Launch a terminal and issue the following command:
$PROMPT> ssh -i ~/.aws/clientname-key.pem username@ec2-10-20-30-40.compute-1.amazonaws.com
Note that username is most often “root” but other distros or AMIs may require a different username. Check with the creator of the AMI for community AMIs. If you see a message about an RSA key fingerprint, just type “Yes” at the prompt and press enter. This is a one-time message.
You should now be connected, and viewing your server instance’s welcome message with a command line prompt.
Setup Elastic IP
At this point you can now navigate to ec2-10-20-30-40.compute-1.amazonaws.com and you’ll see the initial homepage of your bitnami instance. While you can continue to use this moving forward, you can optionally upgrade to using an actual set IP to make things simpler for vhost and SSH access. Elastic IP addresses are static IP addresses designed for dynamic cloud computing. An Elastic IP address is associated with your account, not a particular instance, and you control that address until you choose to explicitly release it.
- Click the Elastic IPs link in the left column under Network & Security

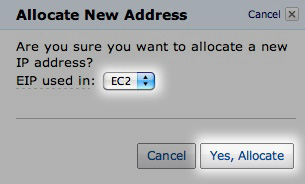
- Click the Allocate New Address button to assign a static IP address to your account (Note: an Elastic IP address is associated with an account and billed accordingly until the address is released)

- After checking the box of the Elastic IP you want associated, select the Associate Address button which will allow you to associate that Elastic IP Address to a running instance

If you’ve gotten this far, you should now be able to point your local hosts file to the IP address of your EC2 instance, launch a browser and check to see that your site is working as expected.
Upload your content
Congratulations! You’re now connected to your cloud instance at Amazon AWS. What next? If you created a server instance based on a default image of Red Hat or Ubuntu, the next step is to install and configure your LAMP stack. If you’re not root, sudo su and you should be good to go with apt-get, dpkg or yum as you’re used to. Your EC2 instance is indistinguishable from a dedicated server.
As you install software, test it and determine it to be working as expected, we recommend that you save your server image to an AMI, also called a snapshot, from the management console, after each step.
An AMI is an Amazon Machine Image, which is basically a copy of your entire server at the moment in time you request the snapshot to be created. Having this snapshot available at any time in the future will save you from having to reconfigure things over again, should your instance unexpectedly terminate (this has never happened to me, but it’s a good practice anyhow).
For our server instance, we used a Bitnami WordPress stack, so we can skip some software installation steps here—our Bitnami AMI comes with Apache, PHP, MySQL, phpMyAdmin and WordPress already installed and configured. Examples like this are one of the many time-saving features that make Amazon AWS great.
Create your own AMI (Amazon Machine Image)
Once you have your site or landing page running and tested from an EC2 instance, you then save a snapshot of the entire cloud server to your own private AMI.
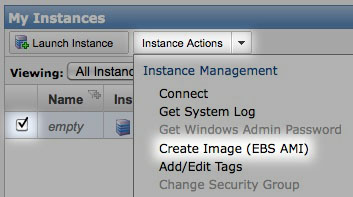
Amazon’s giant library of community AMIs consist of user-contributed server templates created this same way by users just like you. Creating a private AMI periodically while you experiment with AWS is not only useful as a backup strategy, these AMIs also serve as future server templates, available only to you, from which to spawn additional server instances. When developing your server, be sure to name AMIs with a number at the end, e.g. LAMP-01, LAMP-02, etc. You can always go back later and delete previous AMIs. Good naming conventions become even more critical when building an auto-scaling cluster, as we’ll discuss a little later.
Your server will go down for a minute while the AMI snapshot is created, but sit tight, it comes back up automatically. Once your AMI snapshot is ready, you can use it to spawn one, two, three, ten, fifty, or even more instances in record time.
Create Database, MySQL User and Password
Here’s an example command line session that shows how to run MySQL and create your database, then create the username and password with a GRANT statement.
$PROMPT> mysql -u root -p
mysql> create database sitedb;
mysql> GRANT SELECT, INSERT, UPDATE, DELETE ON sitedb.* TO 'siteuser'@'localhost' IDENTIFIED BY 'siteuserpassword';
mysql> exit
Transfer your site files to your EC2 Instance
You may have noticed above that we didn’t open the port for FTP when we set up our Security Group. It’s more secure to use SFTP (file transfer protocol over SSH), or even simpler: scp— the Secure Copy command line utility.
To use scp to upload files to your EC2 instance, first let’s create a single backup of our site. In a new terminal on your local machine, export the site contents from your SVN or Git repository, or download all the files from your current host. Next, use Tar and GZip to bundle the site files using the following command as shown:
$PROMPT> tar -czvf sitefiles.tgz /path/to/site/files
After that finishes, we can send the .tgz file you created to your server instance using the scp command. Note the use of the -i flag to provide the SSH key you created on step 9 above:
$PROMPT> scp -i ~/.aws/clientname-key.pem sitefiles.tgz username@ec2-10-20-30-40.compute-1.amazonaws.com
Once your .tgz is uploaded to the server, switch back over to your terminal still connected to your EC2 instance and unstuff it like so:
$PROMPT> tar -xvf sitefiles.tgz
Then, move the sitefiles into the htdocs or www directory. The location of this directory is different on various systems.
$PROMPT> sudo mv sitefiles/* /opt/bitnami/apache2/htdocs/
You might need to set the owner and permissions using something like:
$PROMPT> sudo chown bitnami:daemon /opt/bitnami/apache2/htdocs
You are done! …
Ok, we did say at the beginning that this was Part 1 right? Currently your EC2 Instance is setup and running, just as your website would be hosted anywhere else. In Part 2, we will cover setting up
Check out the newest shift in cloud-based architectures, the Google Container Engine.


