Next up in the Google Analytics Power User series is something slightly different. Instead of your standard “out of the box” reporting, we’re using Google analytics to look at errors on your site. The most common of which will be the classic “Error 404”.
Whether you are an ecommerce site, lead generation site, or publishing site (even a blog)… you will likely have the occasional technical problem with your site. Sometime your site may throw a 4XX (client error) or 5XX (Server Error). These errors are often created as a result of broken links within your site, so you will want to find them and fix them ASAP.

Setup: Placing the GATC in your Error 404’s, 500’s, etc.
To track error pages you will need to have the Google Analytics Tracking Code (GATC) added to your error page template(s) (contact your webmaster to complete this task). Without the tracking code on the error pages you will not be able report on these pages or find their associated broken links.
As a reference, here is the code:
Var gaJsHost = ((“https:” == document.location.protocal) ? “https://ssl.” : “https://www.”); document.write(unescape(“%3Cscript src='” + gaJsHost + “google-analytics.com/ga.js' type='text/javascript'%3E%3C/script%3E”)); ]]>
Note: Be sure to use your own number under gat.getTracker()
With the GATC on your error pages they will now be tracked as page views. Since these error pages will be considered page views you will want to create a filter that will allow you to view them in isolation from each other.
One important aspect to setting up your error report properly is the naming convention that you use for your error pages’ in the HTML “title” tag. All of the title tags need to be created in a consistent manner so that a single filter will be able to identify them.
An example title tag would be: Error 404 Page.
For other errors you would just replace the ‘404’ with the appropriate error number.
An example of a custom filter that will track the above format would be:
An alternative version of the Field A regular expression is: (Error [0-9]{3}.+)
Once you have the GATC on your error pages and set up your filter to help differentiate the different type of error pages from each other it is time to figure out where your error pages are and which links (broken links) sent your visitors to these non existent pages.
Creating the Report in Top Content
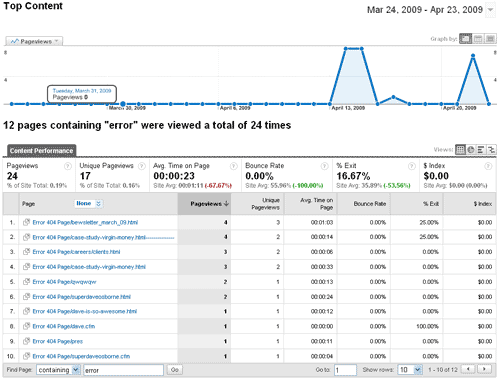
To create your error pages report you will go to the top content report and then filter by the term “error” (assuming you had this word in your error page title tags as we did above). This will bring up all of your error pages and let you see the associated Content Performance metrics associated with them (pageviews, unique pageviews, bounce rate…)
Now that you have identified the error pages we need to track down the broken links that created the error. To do this you will click on an error page in the report to view the content details of that page. From the content details page you will then click on the “Navigation Summary” link on the right side. Once on the Navigation Summary page you will be able to see the page your visitor was on prior to visiting your error page. A quick visit to these pages and you should be able to figure out where your broken links are. Sometimes the pages with the broken links will not be within your site and you will need to contact someone else and ask them to correct the link, or set up a 301 redirect on your site to redirect the inbound visitor to the correct URL.
This is a great report for your webmaster or IT team to review regularly so that you can fix broken links as quickly as possible and reduce the number of error pages that your visitors will see.


